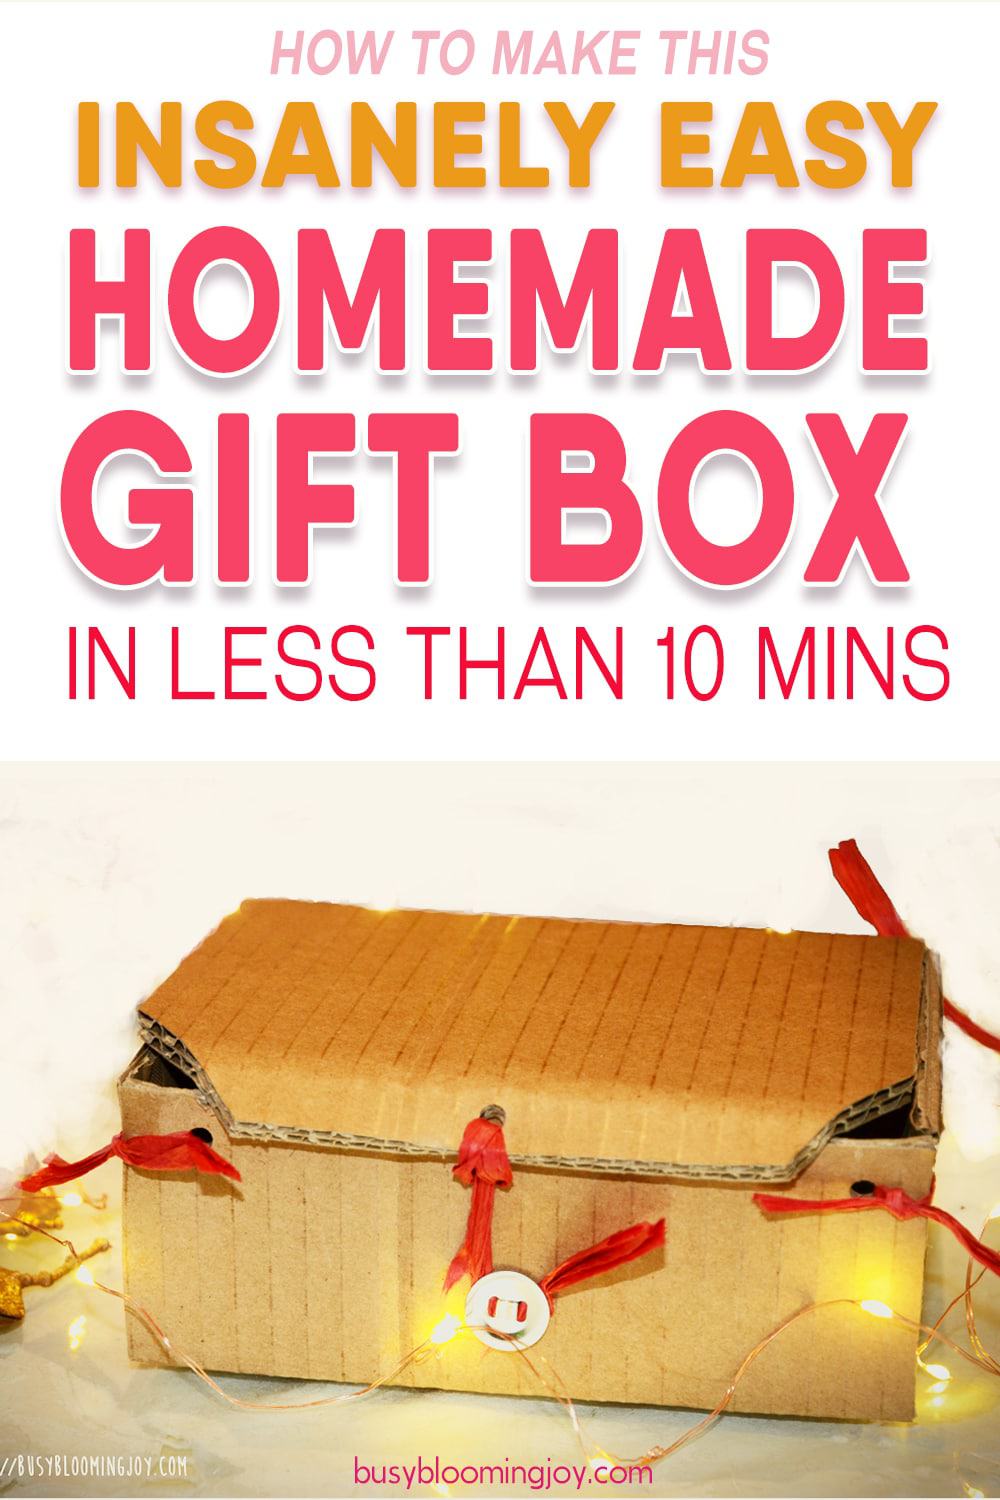
Looking for a DIY gift box you can knock up in minutes? No time or inclination for origami?
Nope, me neither – you need to know how to make a simple gift box, without learning complicated folding techniques! This rustic looking, and most importantly, INSANELY EASY, DIY gift box ticks all those errr…… boxes.
Got kids?
Have you got a toddler or two that would love to get involved? Maybe your kids have made a little something as a gift for a loved one and now you’re looking for a homemade gift box that they can help make and decorate?
This is the perfect gift box for every occasion. Whether it’s for you to make alone or if you’re looking for something kid-made, I’m pretty sure this is going to be one of the best DIY gift box ideas you will ever come across. Bold, but I hope you agree!
And because it’s so quick to make, there should be plenty of time for the fun bit; the decorating!
Dress this gift box up big time for a special occasion or keep it plain and simple. You decide!
Check out this gift box decoration post for ideas or if you’re doing this with little kids and want to decorate the cardboard before making the box, scroll down for pictures of some I did with my toddlers.
Reasons to love this easy peasy homemade gift box
So I’ve mentioned how quick it is, but there are other reasons to love this DIY gift box:
1. It’s unfussy and rustic, so you don’t need to be precise
It’s not meant to be precise and perfect looking. So if your measuring is a bit out or you folding is a little bit dodgy or you punch a hole too close to the edge it doesn’t matter! That’s my kind of crafting – I just don’t have the patience and time to fiddle about getting things just so.
2. Makes a small gift look more substantial (and more beautiful)
Ever have a gift for someone that is tiny in size and looks a bit insignificant on it’s own, a lip gloss for example? So you end up buying something else to go with it. So why not put your little gift in a beautiful homemade gift box? Problem solved.
3 – Cheap as chips!
As you’ll see, there’s nothing more to this box than cardboard, some twine plus a little decoration if you fancy.
3 – Kids can help make it and/or decorate it
Older kids can help make it, it’s that simple, little ones can help decorate!
4 – It can be used again and again…
Homemade gift wrap can also be stunning but once that gift is unwrapped, that beautiful paper will be gone…
5. Perfect for a homemade gift
If you want to go all the way with homemade, there are a ton of ideas for crafty type gifts you can make yourself:
- These faux granite coasters look stunning and would fit perfectly in the medium or large sized gift box in this tutorial
- Who doesn’t get cold hands in the winter? Try these simple DIY hand warmers
- You can never go wrong with edible gifts – these gourmet edible bites look delicious!
- What about this lavender honey sugar scrub? Bet this smells divine
- Next on my crafting list is this peaches and cream handmade soap – another one that looks good enough to eat!
- Perfect for your mum or sister, a homemade lip balm like this – this would look so pretty in the tiny square gift box in this tutorial
6. Perfect for a kid-made gift
I recently made these salt dough Christmas ornaments – they came out rather well! These will be a lovely gift for the grandparents this year and a perfect excuse to do a few of these DIY gift boxes with the kids.
The inspiration behind this simple DIY gift box
I recently bought a set of handmade egg cups from the potter who had crafted them, down in the stunning Western Cape of South Africa. He was busy at his potters wheel when I picked them out and very apologetic about the box he had thrown together to display them in. I immediately fell in love with it!
Here’s the original box with egg cups:
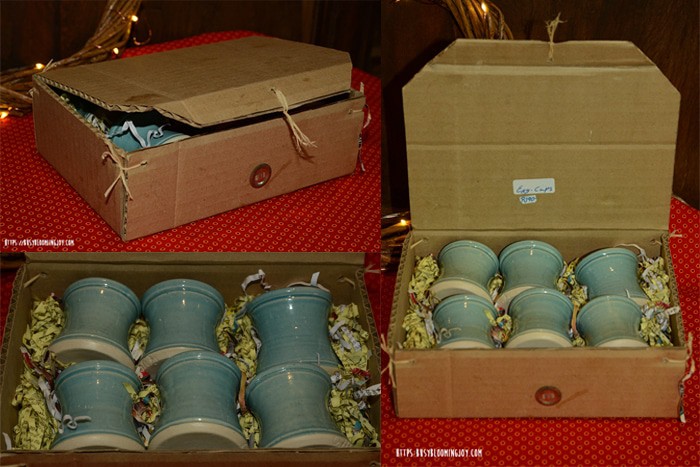
I have been wanting to recreate this design ever since.
With a bit of sprucing up I knew this box could be turned into something special easily – a stunning DIY gift box in the making!
If I’m ever in the area again I will have to take him a few of my efforts. I can’t imagine he’ll mind that I took his idea. From seeing the displays in his workshop, there’s no doubt his talents are in rather a different league to my own…
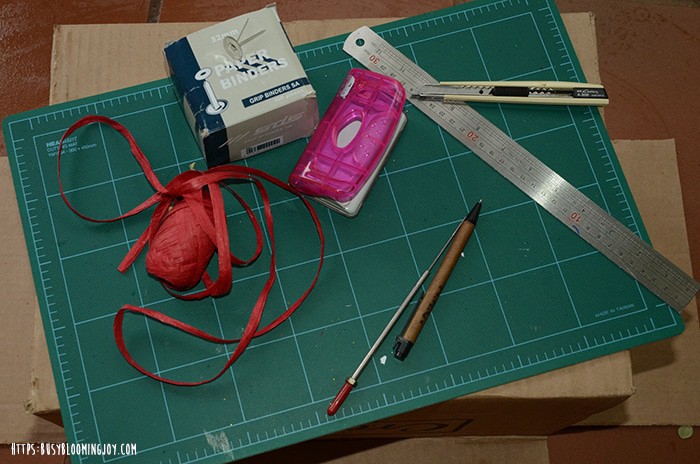
Materials needed to make this gift box
We live in the depths of the African bush. Craft supplies are hard to come by! I had all these materials in the house already, with the exception of the grip binders, which I found in town at the stationers.
- cardboard box – anything bigger than a shoebox will do
- ruler
- pen or pencil
- about 75cm length of string, ribbon or strong thread
- scissors or craft knife (I found a knife much easier)
- cutting board, if you’re using a craft knife
- hole punch
- a paper grip binder (used to keep papers together – see photos in tutorial if you’re not sure)
- skewer or small hole making device (darning needle also works)
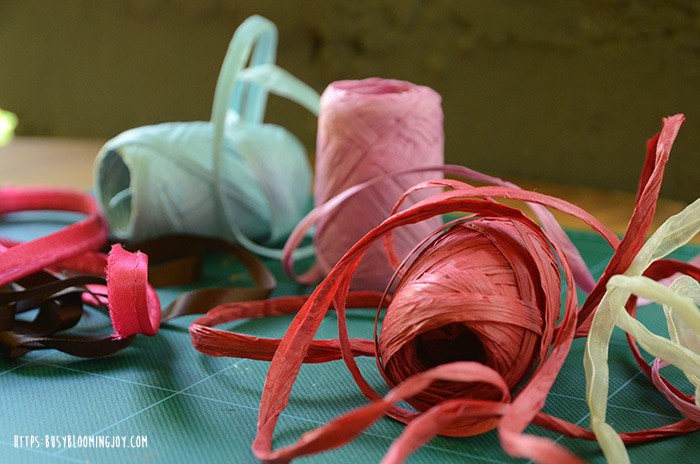
Materials for decorating your gift box
The thread you use to tie your box together maybe all the decoration you want or have time for. Otherwise, there are a ton of things you can try.
If you’re a regular crafter you will probably have a good idea of how you want to decorate your box.
Scraps of wrapping paper (cut into Christmas tree shapes for a festive gift box?), beads, ink stamps, stickers, pompoms… the possibilities are endless.
We live next to my mother-in-law who’s a hoarder of note, particularly when it comes to ribbon, embroidery thread, beads and fabric – perfect for decorating my gift boxes!
Getting the kids involved?
Two different options:
- make the box exactly as below and have the kids decorate it
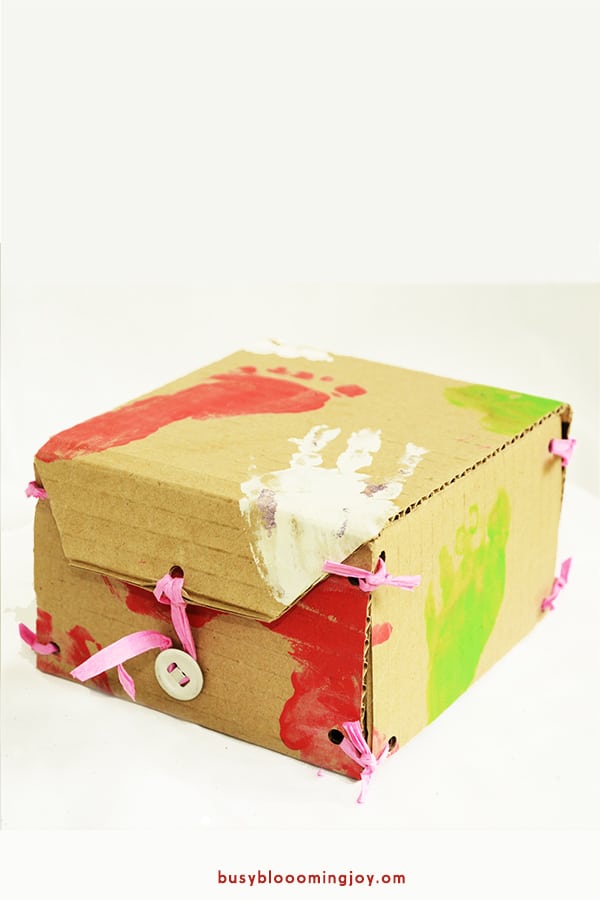
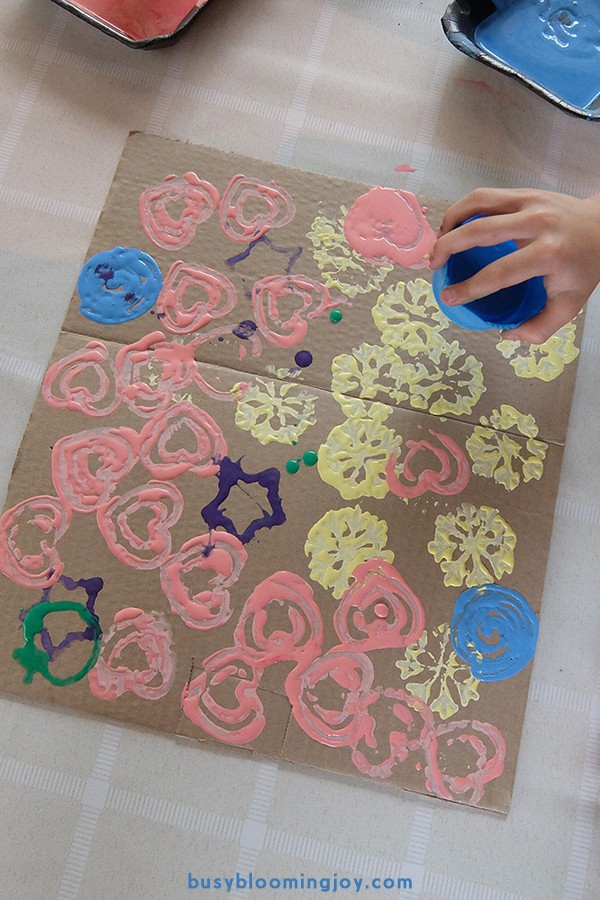
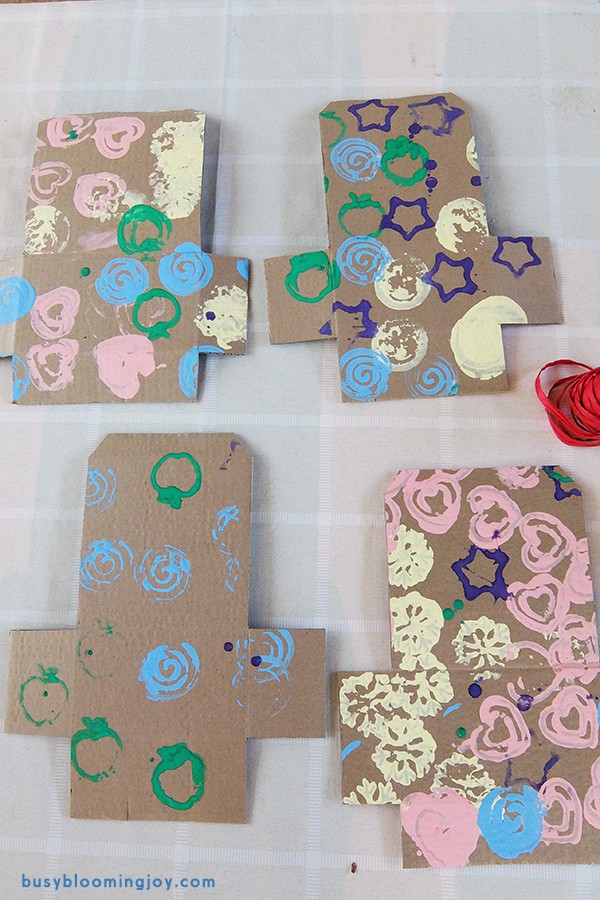
- decorate the cardboard (foot and handprints or just have them print, paint or glitter the cardboard first) – see pictures later in post for an idea
I had so much fun decorating these little gift boxes that I decided to do a whole post on it. Hop on over and check it out these 15 gift box decoration ideas.
The how-to of this insanely easy DIY gift box: step-by-step instructions
1 – Source a cardboard box
Any shape or size will do though there are a few parameters:
- Avoid very large boxes, like packing boxes or those that big electrical devices arrive in. These are often double thickness cardboard which does make it a little trickier to cut, fold and get a hole punch through. Not impossible but I found the single thickness cardboard easier to work with
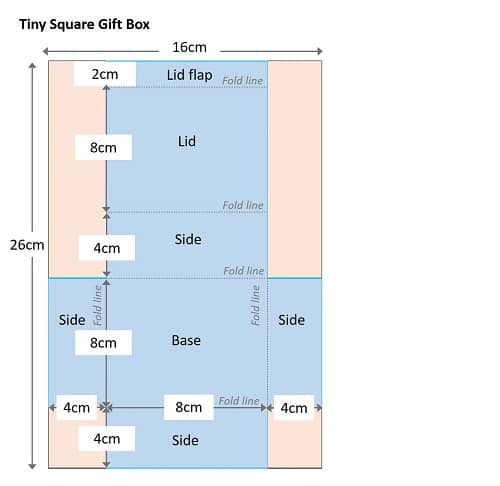
- Avoid very small boxes which won’t have enough flat cardboard to play with… you need the largest side to be at least 27cm x 16cm to make a box with dimensions 8cm x 8cm x 4cm. Any smaller than that and it becomes a fiddle and you won’t fit anything in, so what’s the point!
Try and find boxes that are undamaged by water or too crumpled.
Don’t worry too much about print/logos etc. This will be on the inside of the box so by the time you’ve put the gift inside you will only see the underside of the lid.
Do try and avoid stickers on the inside of the lid – they are very difficult to get off and ugly left on!
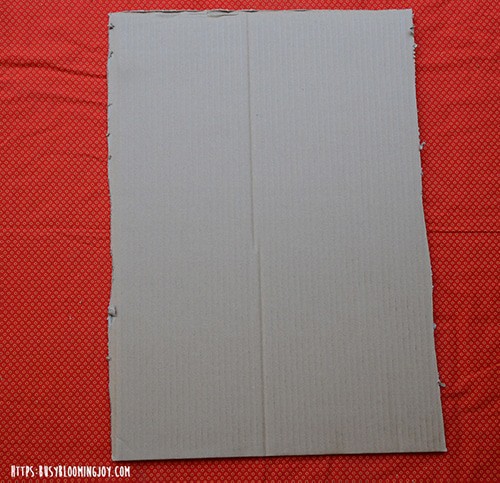
2 – Cut a large piece of cardboard from the box
Just cut it roughly at this stage. Don’t try and cut the exact size, it’s easier to tidy up the sides after, when you’ve decided on the size.
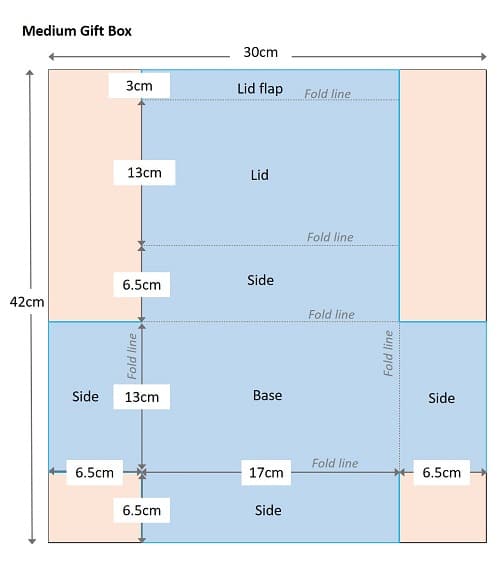
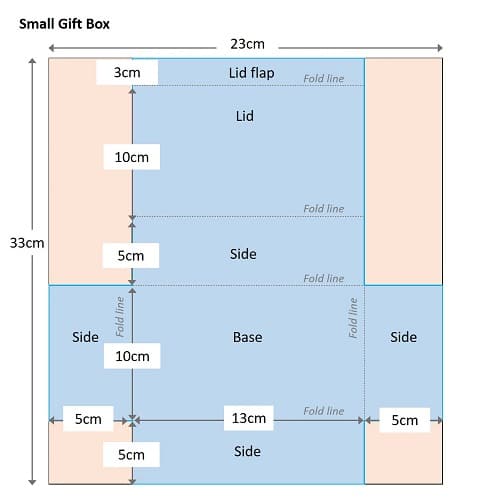
3. Decide on the size of your gift box
After making MANY of these easy DIY gift boxes and experimentation, I’ve come up with the following dimensions as a guide to make different sized gift boxes:
- Large gift box – 20cm by 14cm, depth of 7 cm
- Medium gift box – 17cm by 13cm, depth of 6.5cm
- Small gift box – 13cm by 10cm, depth of 5cm
- Tiny square gift box – 8cm by 8cm, depth of 4cm
You can check out what these different sizes look like at the end of this tutorial.
For these boxes you need to start with the following sizes of flat cardboard:
- Large gift box – 45cm by 34cm
- Medium gift box – 42cm by 30cm
- Small gift box – 33cm by 23cm
- Tiny square gift box – 26cm by 16cm
Of course, you can make this any size you want, depending on the size of the cardboard you’re starting with and the size of the box you want to finish with, but these should be a good starting point.
I’m making the medium gift box in this tutorial.
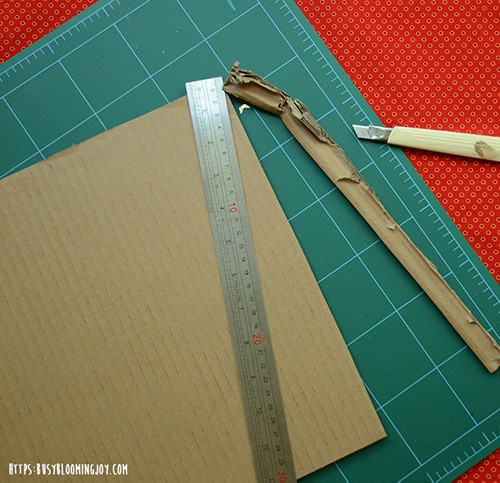
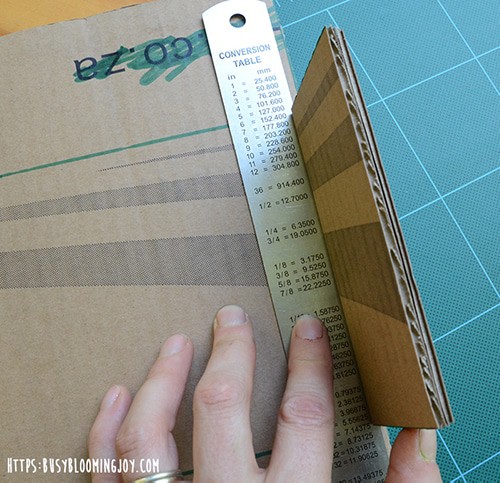
4. Measure out and cut to size your piece of cardboard
Using the dimensions you’ve decided on at the previous step, measure out and cut your piece of carboard to size. You may only need to trim a few edges depending on what size you want your box to be and the size you started with.
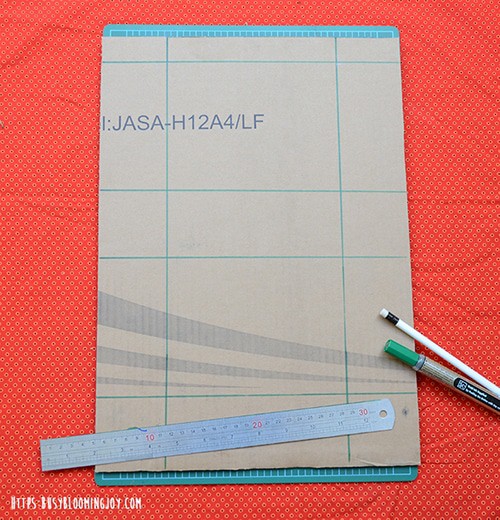
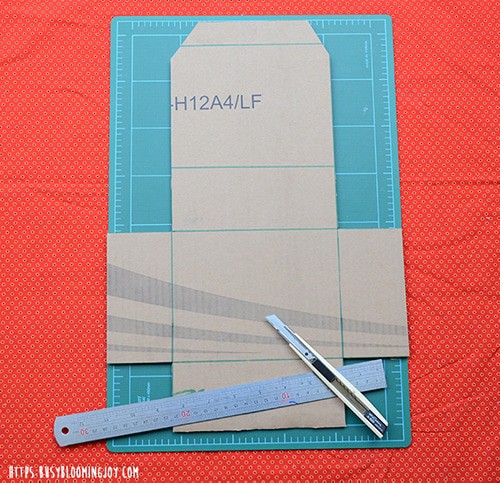
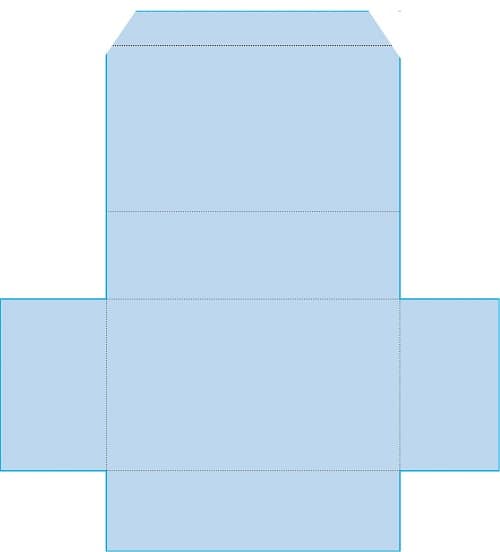
4. Mark out the box edges and fold lines
Mark up your carboard as in the diagrams. The first one has all the lines and the second one has the measurements and labels so you know what is what. (I marked this one out with a marker pen/sharpie so you can see a bit more clearly but I normally use a regular pen or pencil.)
Remember to use the side of the box with the logos/any print when marking up – this will then be the inside of the box.
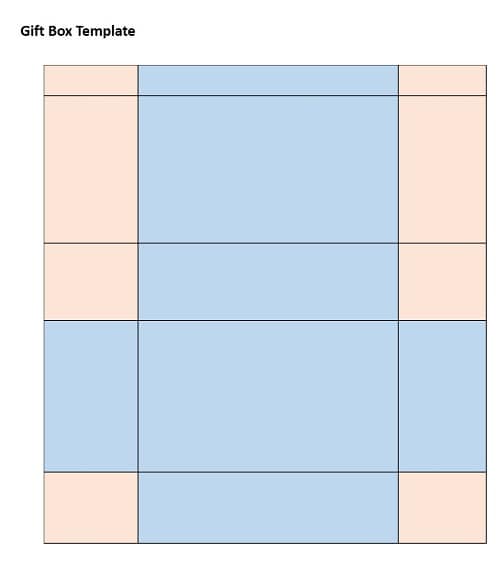

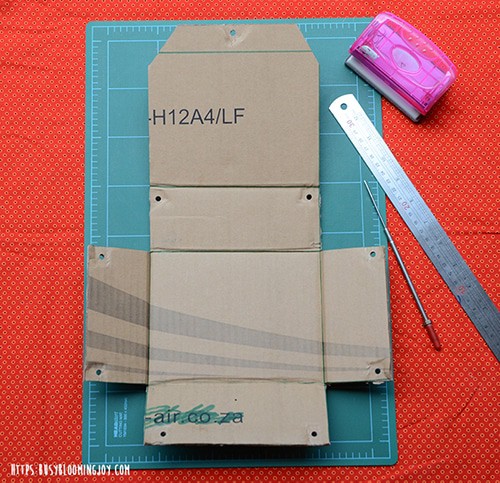
5. Cut out the gift box outline
As in diagram and photo below.
You can see that the corners of the lid flap are cut off – I just did this free hand by eye. You could always measure and mark these lines if you prefer.
6. Fold all the edges but the lift flap edge
I found the easiest way to do this was fold the cardboard against the ruler – you need to push with your hands close to the join line, otherwise the naughty cardboard can fold in a different place. If it does don’t panic ! Just start again – you won’t notice that crease when it’s finished. That’s the beauty of this box!
The reason I recommend to fold the lift flap last is that when you fold and tie up the box you may find you need to re-fold the lid flap. Maybe it was just me and my too quick measuring but chances are things will be a bit out!
7. Punch holes into the corners and lid flap
You need a bit of force here, firstly to get the cardboard into the hole punch and secondly, to get it far enough into the punch that it doesn’t just cut a semi-circle out of the side (as I found out a few times in the beginning). Practice on a bit of scrap cardboard first.
You need to punch a total of 9 holes as shown in the photo below:
- 2 at the top of each side = 8
- 1 in the lid flap
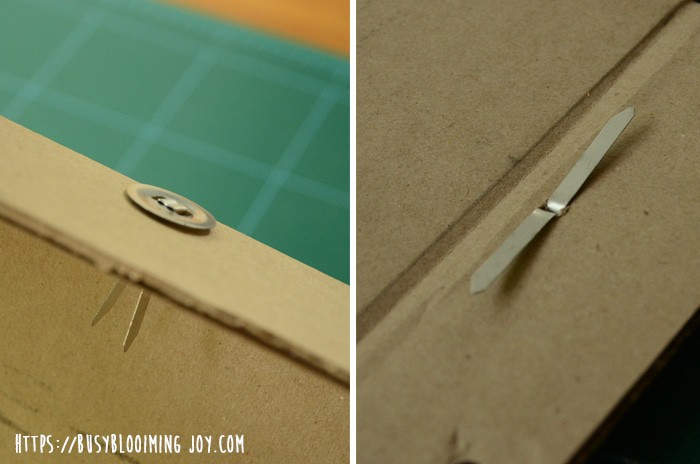
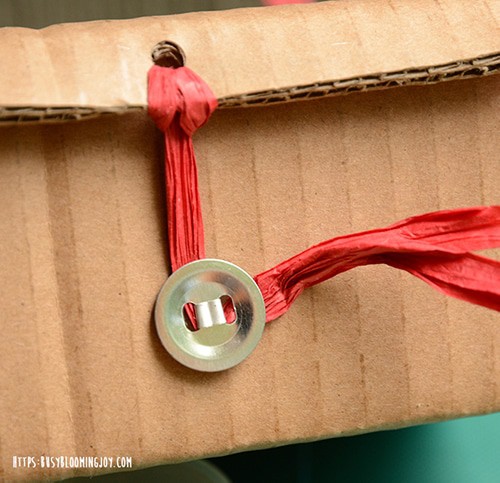
8. Attach the paper grip binder
Use a skewer to make a hole and push the paper grip binder through and press the arms either side to secure:
9. Grab your twine, string, thread etc
You will need around 75cm total length:
- 4x 15cm lengths, 1 for each corner
- 1x 15cm length for the lid tie
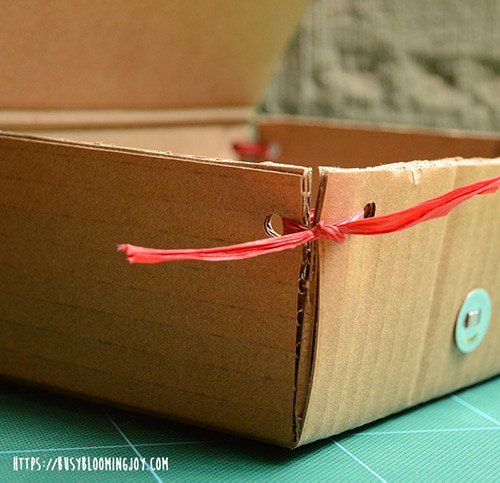
10. Tie each side together
Use a nice strong knot to make the box sturdy. You can use a bow, but tie it after the knot so it can’t come undone.
11. Fold the lid flap
Check where the lid flap needs to fold by shutting the lid and seeing where it lines up. You may even need to trim the sides of the box so that the lid shuts nice and cleanly.
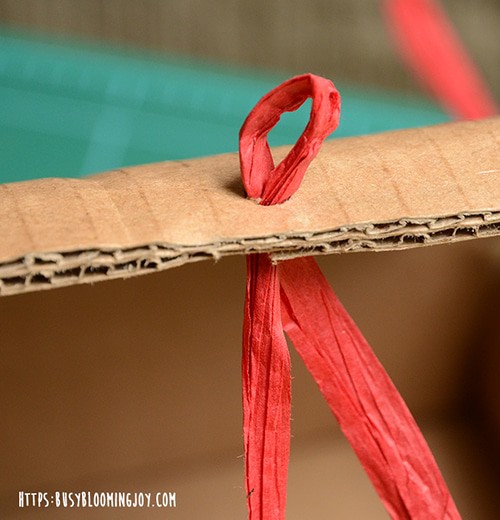
11. Make the lid tie
Fold the last piece of twine in two, push the folded end through the hole and loop the two ends through. You can now shut the box by tying the loose end around the grip binder.
12. Admire your finished box!
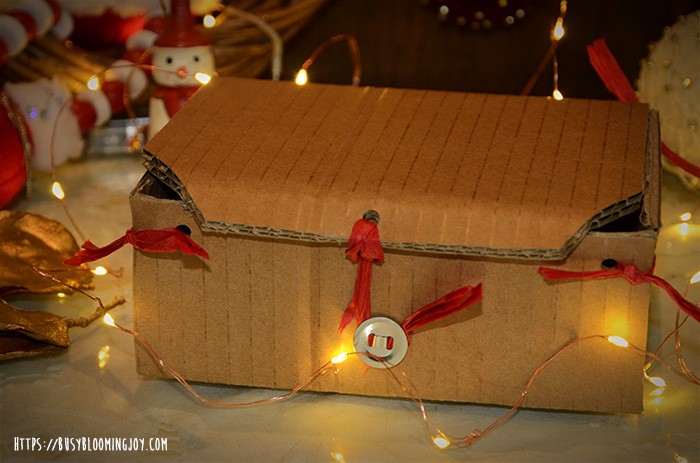
Now seeing as that was so quick, you should have a few minutes to spare to decorate! Check out these 15 gift box decoration ideas here. Happy box making!
Getting kids involved, including toddlers and preschoolers
I’m sure older kids would be more than capable of helping measure the box outline, cut it out and fold it.
That feels like very many moons to me… my two little ones are just 4 and nearly 3…
As I mentioned earlier on, the best way to get toddlers and preschoolers involved and participating is to let them decorate the cardboard before making the box.
That way, if it turns into one giant mess, all you’ve lost is a bit of cardboard. (You may also have lost a little sanity but those just goes with the toddler territory some days, right?!)
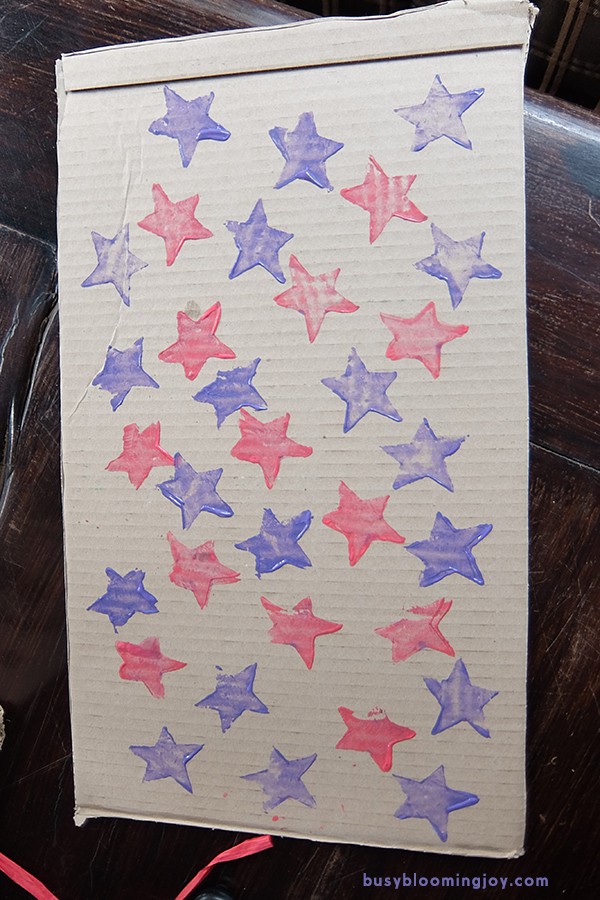
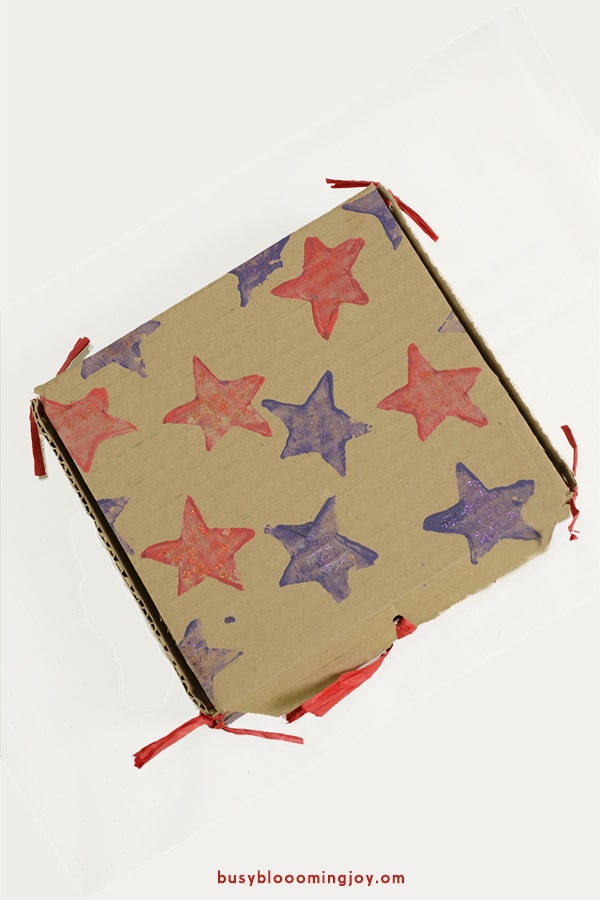
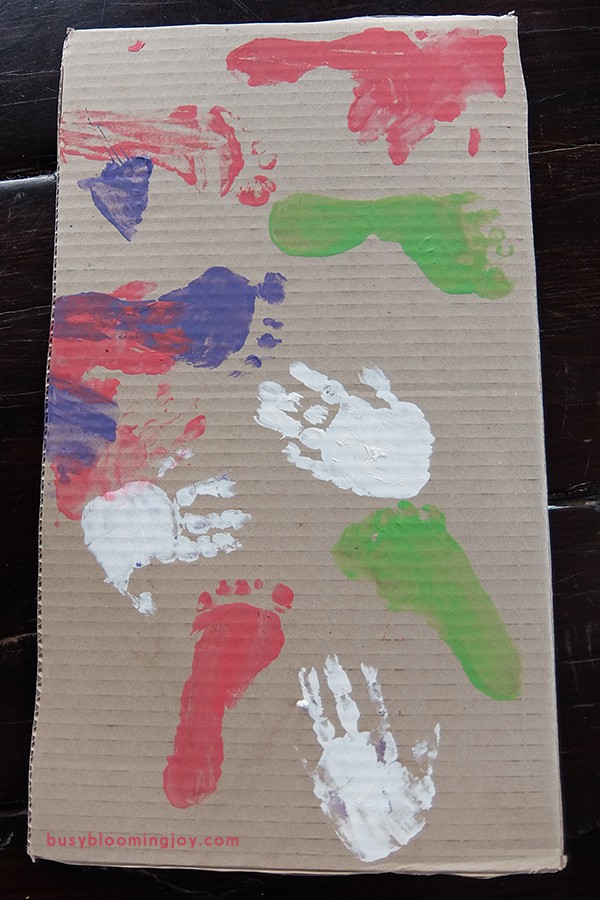
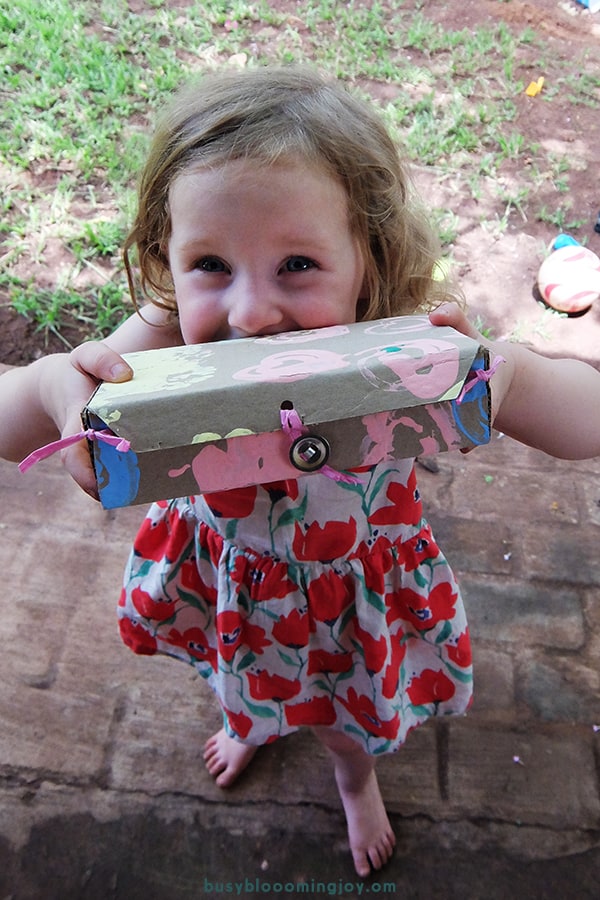
I’ve made these DIY gift boxes twice with my toddlers. Once I used potato stamps, once we did some hand and footprints and the third time I used some rather funky looking stamps I bought (they’re cr*p, the potato stamps worked a lot better but did involve a bit of work to make).
Here are a few pictures of the carboard and the finished boxes.
Ok, that’s it!
Don’t forget to check out these easy gift box decoration ideas here.
For more toddler crafts, check out:
- Stupidly easy paint chip Christmas tree card (easy enough for little toddlers)
- 29+ adorable Christmas ornaments to make with your toddlers (that won’t drive you bonkers)
- Salt dough Christmas tree ornaments to make with toddlers – simple and stunning!
- Puffy paint spider web craft – fine motor control for kids
- Leaf monster craft for toddlers: super-friendly, sorry scary (!), and perfect for Fall
- 37 Not-so-spooky Halloween crafts & activities for your toddler